 Download
If a Twitch Highlight freezes, skips part of the action or loses audio sync after you have already picked the moment, the immediate problem is not finding the highlight. It is getting a dependable file you can actually edit and publish. Twitch’s Highlighter is useful for creating Highlights from past broadcasts, but it is still a platform-side workflow: you select a section of a VOD, then rely on Twitch to create the finished Highlight.
For occasional clips, retrying the Highlight may be enough. For creators regularly turning streams into Shorts, TikToks or YouTube uploads, it is worth separating two jobs: use Twitch for discovery, sharing and community context; keep a local replay capture path for the moments you cannot afford to lose.
First, confirm where the problem begins
Before changing your whole setup, compare the same moment in three places: the live stream or original VOD, the Twitch Highlight in the browser, and the downloaded Highlight file. That quick check tells you whether you are looking at a stream/capture issue, a browser playback issue, or a problem introduced while the Highlight was created or downloaded.
- If the live stream and original VOD are both clean, but the Highlight freezes or drifts, do not assume your gameplay recording setup is the cause.
- If the Highlight plays badly only in one browser, test another browser or player before rebuilding the clip.
- If the downloaded file is broken as well as the hosted Highlight, retry the export with slightly adjusted in/out points and check the new file before editing it.
- If the original VOD itself is out of sync, investigate your stream software, audio-routing and encoder settings; a local replay workflow prevents a future platform-export dependency, but it cannot repair a source that was captured incorrectly.
Creators have reported cases where the source VOD appeared clean while a generated Highlight briefly froze and then remained out of sync, including in downloaded copies. Those reports are useful warning signs, not proof of one universal Twitch fault or a diagnosis for every channel. ([reddit.com](https://www.reddit.com/r/Twitch/comments/1sgtydq/highlight_feature_issues/?utm_source=openai))
Why retrying a Twitch Highlight is sometimes enough—and sometimes isn’t
A retry is reasonable when the clip is non-urgent, the VOD is intact and the error seems isolated. Twitch also supports stream markers, which can make worthwhile moments easier to find later in the Highlighter.
The limitation is timing. A platform Highlight is made after the stream from material held on the platform. If the chosen export has a bad endpoint, an audio hitch or a playback/download problem, you are back in a recovery loop: test, adjust, regenerate, download and verify. That may be acceptable for a weekly recap. It is a poor fit when a fast reaction, tournament play or a one-off moment needs to become a social clip while it is still relevant.
Platform Highlights vs local replay capture
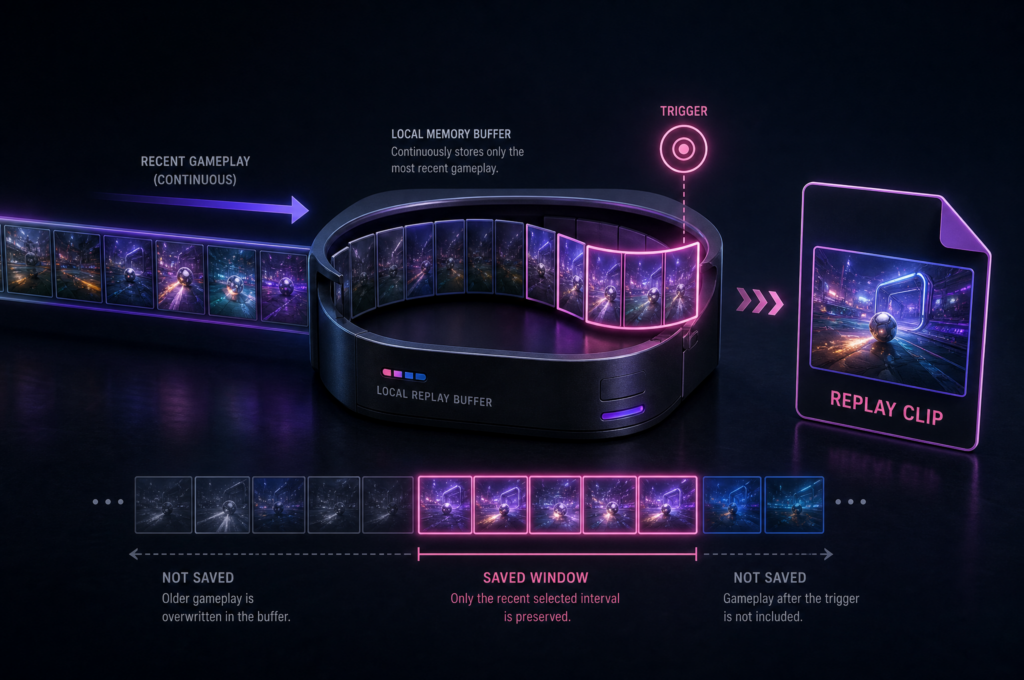
These approaches are complementary, but they solve different problems. A Twitch Highlight is a post-stream selection from a VOD. Local replay capture continuously holds a chosen amount of recent footage on your PC, then saves that interval when you trigger it. The important distinction is that the local file is created from your capture workflow at the moment you choose, not reconstructed later from a platform VOD.
- Twitch Highlights: best for preserving longer VOD segments on your channel, assembling several segments, or working after the stream when you did not save a local moment.
- Local replay capture: best for a clutch, funny fail or quick reaction you want to secure immediately as a file for editing and publishing.
- Use both: let Twitch VODs and markers help you discover material, but save the moments that matter most locally while you are live.
This is not an argument that every creator should abandon Twitch Highlights. It is a reliability decision. The more costly it is to re-find, re-cut and re-export a moment, the more useful it is to have a local copy under your control.
Why a local replay copy is the more reliable fallback
A replay buffer avoids the most frustrating version of the platform-only workflow: seeing the perfect moment, identifying the timestamps, then discovering the exported Highlight is unusable. Instead of recording an entire multi-hour stream, you keep only a recent window ready to save. Choose a duration that gives the play enough setup and aftermath, often longer than the exact final social edit, then save it as soon as the moment ends.
With Cutscene Replay, the rolling replay buffer is held in RAM and the Save replay action commits the recent interval you selected. The saved replay is sent into an export queue while capture can continue, so saving one moment does not mean you have to stop playing or streaming to wait for it to write.
For compatible footage, Cutscene can use Fast Remux rather than fully re-encoding the clip. In plain English, it can package the existing encoded media into the saved file when the media passes its checks, avoiding an unnecessary full transcode. That can reduce the delay between pressing save and having a usable local highlight, while preserving the option to keep Cutscene in the background during export work.
A practical workflow for streamers who publish regularly
- Set a replay duration that covers your typical moment. A 30-second window may suit a quick elimination; longer sequences may need more context before and after the key action.
- Keep Twitch stream markers available for moments you may revisit later, especially for longer edits or compilations.
- When a must-keep moment happens, save the replay locally straight away. Treat that local file as your working master for short-form content.
- Let the local export finish in the background while you keep streaming or playing.
- Open and check the saved clip before investing time in captions, reframing or edits. If it is good, edit from that copy instead of waiting on a platform Highlight.
- Use the Twitch VOD and Highlight tools for secondary moments, archives and longer channel-facing content.
If you are new to replay capture, this guide to saving gaming highlights without recording the whole session explains the basic buffer approach. If you want to compare general capture workflows, see how OBS and Streamlabs differ for recording clips.
When Twitch Highlights are still the right tool
Stay with Twitch Highlights when you need a long VOD segment, a multi-part Highlight for your channel, or a moment you did not capture locally. Twitch’s Highlighter supports creating Highlights from past broadcasts and can combine multiple segments into one Highlight.
Also keep using platform clips and sharing tools for discovery. Twitch supports clip creation from live streams and VODs, and its clip tools can share directly to several social platforms. A local clip is not a replacement for those audience and platform features; it is insurance for the actual media file when reliability matters.

Keep the moments you choose
Try Cutscene Replay if you want to save recent stream moments locally, keep playing while clips export in the background, and avoid relying on a later platform Highlight as your only usable copy.
The sensible answer: do not make one export path do every job
If Twitch Highlights occasionally freeze or go out of sync, retrying the export and checking the source VOD are sensible first steps. But if you publish clips often, the stronger long-term workflow is not to depend on a post-stream Highlight as your only copy of an important moment.
Use Twitch to stream, archive, find moments and share with viewers. Use a local replay buffer to secure the moments you choose, immediately, in a file that is ready for your editing workflow. That turns a broken Highlight from a lost opportunity into an inconvenience.