 Download
Table of contents
- 1. Understanding the Cutscene workflow
- 2. Installation, first launch and access
- 3. First-time recorder setup
- 4. Profiles and workspace organisation
- 5. Adding and managing sources
- 6. Building the Horizontal and Vertical compositions
- 7. Setting up audio
- 8. Replay buffer, quality and saving clips
- 9. Saving editable Source Footage
- 10. Using the Clip Library
- 11. Opening the Clip Editor
- 12. Timeline editing
- 12.1 Selecting tracks and blocks
- 12.2 Scrubbing and exact playhead positioning
- 12.3 Trimming a segment
- 12.4 Cutting/splitting at the playhead
- 12.5 Joining and breaking joins
- 12.6 Deleting timeline content
- 12.7 Timeline snapping and Alt override
- 12.8 Timeline zoom and length
- 12.9 Adding tracks, media and audio
- 12.10 Renaming, hiding and resizing tracks
- 13. Timeline filmstrip previews
- 14. Visual and audio keyframes
- 15. Visual effects, transitions and imported media
- 16. Captions
- 17. Exporting the finished edit
- 18. Troubleshooting common workflows
- 18.1 “I pressed the hotkey and nothing was saved”
- 18.2 “The game is visible but there is no game audio”
- 18.3 “My webcam or window disappeared”
- 18.4 “Recording performance became unstable”
- 18.5 “Source Footage is missing”
- 18.6 “The Clip Library looks stale”
- 18.7 “Timeline thumbnails are incomplete while playing”
- 18.8 “A transition will not become longer”
- 18.9 “Cutscene says Replay paused — trial ended”
- 19. Recommended creator workflows
- 20. Frequently asked questions
- 20.1 Does Cutscene record my entire session to disk?
- 20.2 Can I change the default 30-second replay duration?
- 20.3 Can I record only Horizontal or only Vertical?
- 20.4 Does Show both mean both outputs are being recorded?
- 20.5 Can Horizontal and Vertical have different layouts?
- 20.6 Can I edit the camera separately after capture?
- 20.7 Why is “Always open editor in Source Footage mode” missing from Settings?
- 20.8 Why does an older clip still have no Source Footage after I enable source export?
- 20.9 Can I keep both the ready replay and editable sources?
- 20.10 What is the difference between fast remux and full normalisation?
- 20.11 Can I use a second monitor for the editor timeline?
- 20.12 Can I animate a zoom or move?
- 20.13 Can I animate audio volume?
- 20.14 Are captions generated online?
- 20.15 Where do exported edits appear?
- 20.16 What happens to my clips if the trial expires?
Cutscene Replay is designed around a retrospective workflow: keep a short rolling window of gameplay or desktop footage ready in memory, save the moment after it happens, and then decide how much editing that moment deserves. This guide explains the complete workflow rather than simply describing individual controls.
The wording and workflows below are based on the Cutscene Replay 1.3.86 canonical feature table and the 1.3.86 application interface. If a control is conditional, the guide explains what has to be true before it appears.
1. Understanding the Cutscene workflow
1.1 Replay capture rather than session recording
Cutscene is not primarily a traditional “press Record, play for three hours, stop recording” application. Its normal workflow is to keep a rolling replay buffer active. The newest footage enters the buffer continuously and footage older than the configured replay duration falls out of it. When something worth keeping happens, you press Save replay or a replay hotkey and Cutscene preserves the recent window.
That distinction changes how you should use the application. You do not need to predict the interesting moment in advance, and you do not need to create a multi-hour recording just in case something happens. Your main responsibility is simply to make sure the buffer is running before the session begins.
A good habit: when you launch a game, glance at the status pill in the top-right of Cutscene. If it says the buffer is running, you can play normally. If it says Not buffering, press Start buffer before relying on the replay hotkeys.
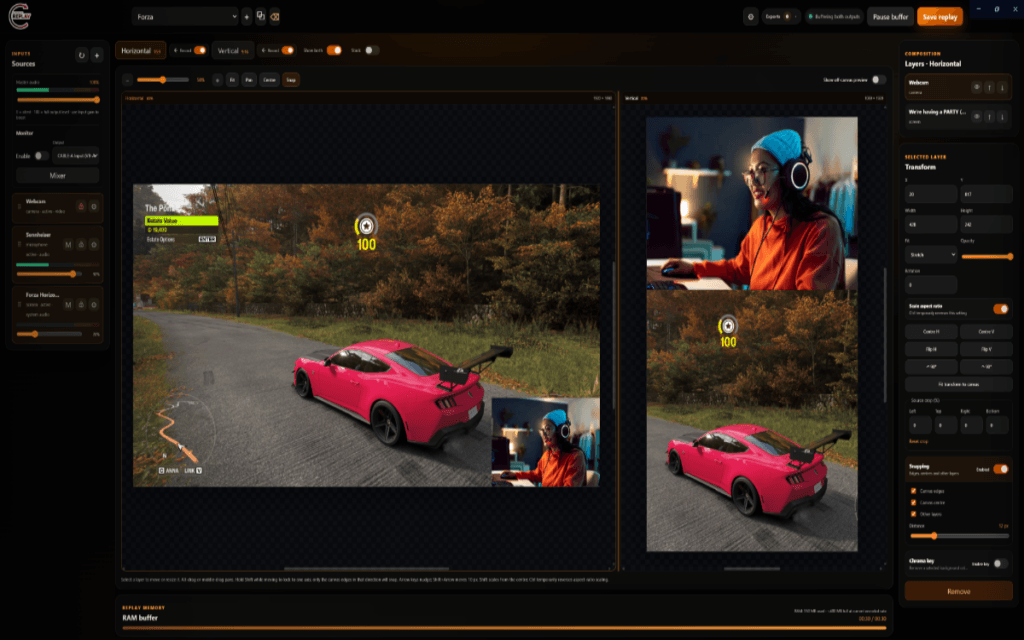
1.2 Horizontal and Vertical are two compositions of the same moment
A Cutscene scene profile contains two output canvases: Horizontal and Vertical. Both can use the same live sources and the same replay timing, but each canvas has its own layout. This is what allows gameplay to remain full-width on a landscape output while the same source can be cropped, enlarged or repositioned for a 9:16 vertical version.
Do not think of Vertical as an automatic centre crop of Horizontal. Treat it as a second composition. If you use a webcam, for example, it may be a small corner element on Horizontal and a larger upper section on Vertical. The two files can still represent exactly the same captured event.
1.3 Recorder, Clip Library and Clip Editor
The application has three main stages:
- Recorder: build profiles, add sources, arrange the two canvases, configure audio and keep the replay buffer running.
- Clip Library: find and preview saved replays, filter a large capture history, manage files and open a clip for editing.
- Clip Editor: trim, split, add media and audio, animate properties, apply effects and transitions, generate captions and export a finished edit.
You do not have to use every stage for every clip. A compiled replay can be usable immediately. The editor is there when a moment needs trimming, reframing, captions or a more deliberate post-production pass.
2. Installation, first launch and access
2.1 Installing Cutscene Replay
Install Cutscene through the Windows package you obtained, normally the Microsoft Store distribution. Once installed, launch it from Windows as you would any other desktop application.
On first use, Windows may ask for permission when Cutscene first accesses a camera, microphone, screen or other protected capture source. Grant the permissions needed for the devices you intend to use. If a webcam or microphone later appears to be missing, Windows privacy permissions are one of the first things to check.
Cutscene creates its default clip location under your Windows Videos folder as Videos/Cutscene Replay. You can change this later from Settings → Recorder → Clip folder.
2.2 Choosing the interface language
The first screen includes the language selector. Changing it updates the onboarding screen immediately; you do not need to restart Cutscene first.
After onboarding, language can be changed from Settings → Application → Language → Interface language. Cutscene supports English (UK), German, French, Spanish, Portuguese (Brazil) and Japanese, as well as a system-language mode where appropriate.
If you are following this guide while using another language, the location and function of the controls are the same even though their labels are translated.
2.3 Starting the 14-day free trial
A new unlicensed installation opens on the Cutscene welcome screen. The trial is full-featured and does not require payment details.
To begin:
- Choose your interface language if necessary.
- Select Start Free Trial.
- Cutscene records the trial start and exact expiry time locally.
- The normal recorder workspace opens with the full application available.
The 14-day period begins when you explicitly start it; simply installing or opening the welcome screen does not consume trial time.
You can see the remaining time later under Settings → Licence. During an active trial the summary shows the trial state, the remaining days/hours (or hours/minutes near the end) and the exact end date/time rather than irrelevant paid-subscription fields.
2.4 Activating an existing licence
If you already own Cutscene, choose Enter Licence on the welcome screen instead of starting the trial. You can also activate from Settings → Licence at any time.
Enter the licence key and select Activate licence. Once activation succeeds, the licence-entry field is removed and the access summary updates to the licensed state.
The Licence tab also contains Check licence now, Manage subscription and Deactivate this installation where applicable. Use Check licence now if your subscription status has recently changed and the application has not yet refreshed it automatically.
2.5 What happens when the trial expires
If the trial expires while Cutscene is closed, the next launch opens in the trial-ended state. New replay capture is unavailable, but the existing Clip Library remains accessible so your previously created content is not held behind the licence screen. Use the inline licence field if you have purchased Cutscene, or Get Cutscene to open the purchase route.
If the trial crosses its expiry point while Cutscene is already running, Cutscene can offer Continue Current Session so an active stream or gameplay session is not abruptly interrupted. The grace state is deliberately tied to that already-running session. Closing Cutscene consumes that session continuation; reopening the application does not create a new one.
When capture is no longer authorised, the recorder clearly reports Replay paused — trial ended so it does not look as if moments are still being buffered.
2.6 Updates
When a newer build is available, Cutscene can display an update banner with Download update and Remind me later. The Licence settings panel also shows the installed and latest versions and may identify a security release.
Update when convenient, but avoid beginning a package update in the middle of a capture session. Saved clips and user settings are designed to survive application updates.
3. First-time recorder setup
3.1 Start with the default profile
A fresh installation already contains a Default scene profile. Use it for your first test instead of immediately building several specialised profiles. The quickest path to a reliable setup is to make one simple profile work from capture to saved clip, then duplicate or expand it later.
Fresh-install defaults in 1.3.86 are intentionally suitable for a modern gameplay test:
- replay duration: 30 seconds;
- frame rate: 60 FPS;
- bitrate: 24 Mbps;
- post-save capture delay: Off;
- Horizontal: 1920×1080;
- Vertical: 1080×1920;
- both outputs enabled;
- Show both enabled;
- snapping enabled;
- compiled clip export enabled; and
- default clip folder: Videos/Cutscene Replay.
These defaults apply to new settings only. Updating an existing installation does not overwrite the recorder choices you have already saved.
3.2 Open Recorder settings
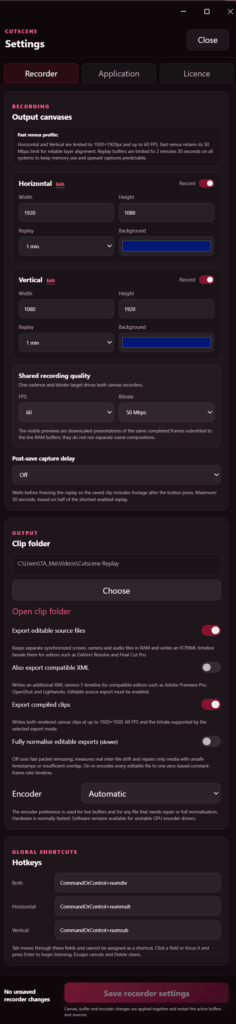
Select the gear icon in the top bar and open the Recorder tab. Recorder settings are grouped into output canvases, shared recording settings, output/export options and hotkeys.
Changes in this tab are staged rather than applied one field at a time. Watch the save bar at the bottom of the Recorder settings panel. When you have changed a canvas, replay, encoder or export setting, select Save recorder settings. Applying those changes may restart active buffers and source runtimes so the recorder is using one consistent configuration.
Do not repeatedly change FPS, bitrate and output dimensions while diagnosing a source problem. First make sure the correct source is visible; then tune recording quality.
3.3 Check the two output canvases
In Settings → Recorder → Output canvases, confirm that Horizontal and Vertical have the dimensions you want. The Record toggle on each output decides whether that canvas participates in replay capture.
For the default social-video workflow, leave both enabled. If you are deliberately producing only one format for a particular profile, disable the unused output. This reduces work and prevents unwanted files from being created.
Canvas names can be edited. Naming is useful when a profile represents something other than the conventional landscape/portrait pair, but keeping Horizontal and Vertical is clearest for most users and matches the rest of this guide.
3.4 Add your first Screen / window source
Return to the main workspace. In the left Sources panel, select the + button and choose Screen / window. Cutscene presents the Windows capture choices; select the display or application window that contains the content you want to keep.
Once the source connects, verify the picture before doing any layout work. If you intended to capture a game window but selected the whole display, change the source now instead of attempting to crop the desktop down later.
A screen/window capture can also carry Windows system audio when Windows exposes it. If Cutscene adds the picture but reports that system audio was unavailable, make sure audio is actually playing and use the source reconnect route to try again. Do not assume that a moving picture means game sound is also being recorded.
3.5 Add a microphone or other audio input
Open the + source menu again and choose Mic / Audio. Select the microphone, mixer input or virtual audio device you actually want recorded.
Speak at your normal gaming/streaming volume and check that its meter responds. If you use a virtual mixer, select the endpoint that contains the desired signal rather than relying on the Windows default device by habit.
At this stage, keep the signal path simple. A display/game source plus system audio and one microphone is enough to validate the replay workflow. Add cameras, media and more complex routing after the first saved replay is correct.
3.6 Set and test your hotkeys
Open Settings → Recorder → Hotkeys. The defaults are:
- F8 — save both outputs;
- Ctrl+F8 — save Horizontal only; and
- Alt+F8 — save Vertical only.
To change one, focus the hotkey field and press Enter or click it to begin listening, then press the shortcut you want. Escape cancels and Delete clears the binding. Tab is reserved for keyboard navigation and cannot be assigned.
Hotkeys are global, so the important test is not whether they work while Cutscene is focused. Start the buffer, switch into your game and trigger the shortcut there.
3.7 Save a deliberate test replay
Before spending time refining the scene, create a controlled test:
- Press Start buffer.
- Wait until the buffer has accumulated enough time to cover the intended replay window.
- Perform an obvious action on screen and say a short phrase into the microphone.
- Wait a few seconds.
- Press F8 or the Save replay button.
- Open Clip library and preview the new clip.
Check that the visible moment, duration, Horizontal layout, Vertical layout, game/system audio and microphone are all correct. Fix capture problems in the recorder before trying to repair them in the editor.
4. Profiles and workspace organisation
4.1 Creating profiles for repeatable setups
The profile selector sits in the top bar. Next to it are controls to create, duplicate, rename and delete a scene profile.
Use a new profile when the capture setup itself changes: a different game, a different window source, a different monitor, a different camera arrangement or a materially different layout. Avoid creating a new profile merely because you are capturing another session of the same game.
A practical naming pattern is Game – Layout, for example COD4 – Gameplay + Cam or Desktop – Tutorial. Descriptive names become increasingly valuable because the Clip Library can filter clips by profile.
4.2 Duplicating instead of rebuilding
If a new setup is mostly similar to an existing one, select the existing profile and use Duplicate profile. Then rename the copy and change only what differs.
This is particularly useful when you want several variations of the same scene — for example, one with a webcam and one without — because it preserves the established source arrangement, canvas settings and audio choices.
4.3 Exporting and importing profiles
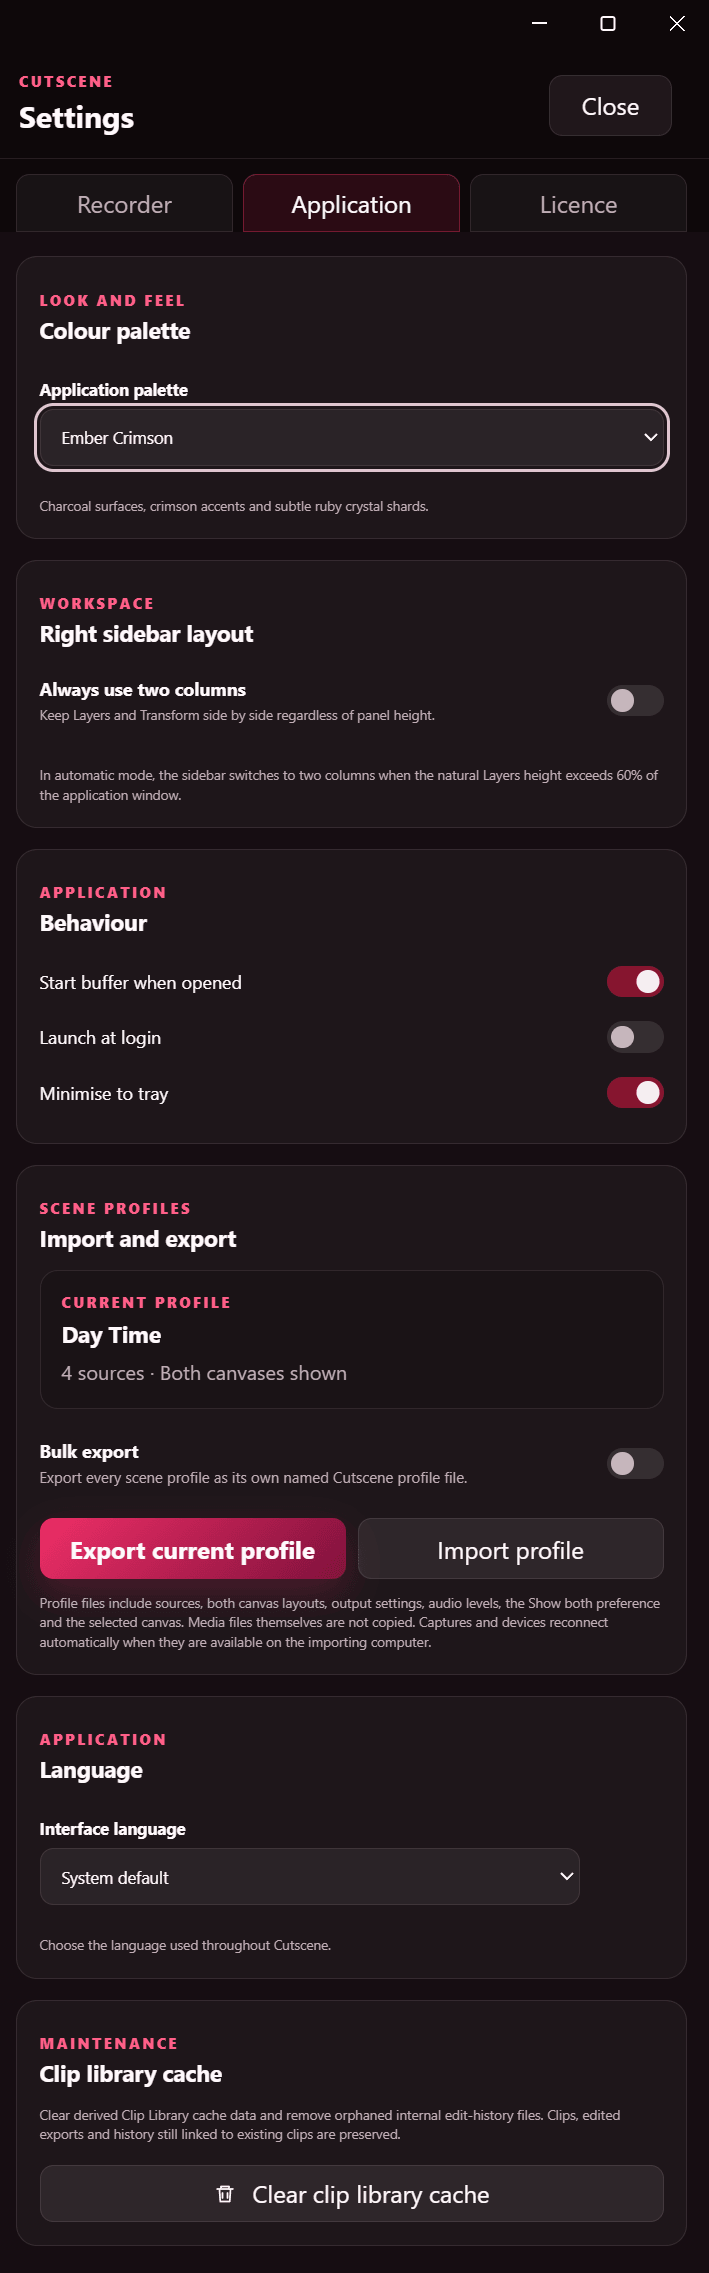
Profile transfer controls are under Settings → Application → Scene profiles → Import and export.
Use Export current profile to save the selected scene as a portable Cutscene profile file. Enable Bulk export first if you want every stored profile exported individually. Use Import profile on another installation or after rebuilding a setup.
Profile files contain the source definitions, both canvas layouts, output settings, audio levels, Show both preference and selected canvas. Media files themselves are not embedded in the profile. A profile that references a local image/video or a particular device still depends on that media or device being available on the importing computer.
4.4 Organising the main workspace
The main recorder has a Sources sidebar on the left and Layers/Transform sidebar on the right. Both can be collapsed from the top bar when you want more room for the previews.
Under Settings → Application → Workspace, Always use two columns keeps Layers and Transform beside each other on the right. If enabled, Reverse column order swaps their positions. In automatic mode the right sidebar changes layout according to the available height.
Use these options for comfort rather than functionality. They do not alter the captured scene.
4.5 Application behaviour and appearance
Under Settings → Application, you can choose the application colour palette, enable Start buffer when opened, Launch at login and Minimise to tray.
Start buffer when opened is useful once your profiles are reliable because it reduces the chance of forgetting to begin capture. During initial setup, leaving it off can be more convenient while you are changing devices and recorder settings.
Launch at login and Minimise to tray suit users who want Cutscene available throughout the day. Remember that automatic availability is not the same as proof that the buffer is currently active; still check the replay status before an important session.
5. Adding and managing sources
5.1 Source types
Use the + button in the Sources panel to add one of the five main source types:
- Screen / window — a display or individual application/window, with system audio where available;
- Webcam — a camera input;
- Mic / Audio — a microphone, mixer or other audio input;
- Media file — an image or video used as part of the live scene; and
- Text — editable text rendered as a scene layer.
A profile can contain multiple sources. Add only the sources that serve a clear purpose; a smaller scene is easier to troubleshoot and generally lighter to process.
5.2 Screen and window capture
Choose a specific window when you want to isolate an application from the rest of the desktop. Choose a display when your workflow genuinely requires everything on that monitor.
If a saved screen/window is no longer available — for example because a game was closed and reopened — Cutscene tracks source availability and attempts bounded reconnection. Use Refresh sources or the source reconnect action when a window/device has changed. Cutscene is designed to acquire a replacement before releasing the old source where possible, reducing unnecessary visual interruption.
If the source repeatedly fails to reconnect, close any stale instance of the game/application, reopen the desired target and then refresh/reconnect. Do not repeatedly delete and recreate a profile unless the saved source definition itself is no longer useful.
Where the selected desktop capture supports it, source settings can control cursor capture. Use cursor recording for tutorials where viewers need to follow pointer movement; disable it for clean gameplay capture when supported by the Windows capture backend.
5.3 Webcam sources
Choose Webcam, then select the camera. After it connects, add it to the appropriate canvas layouts and resize it there.
A webcam source is shared by the profile but its visual treatment does not have to be shared. A common pattern is a smaller lower-corner camera on Horizontal and a larger portrait-friendly placement on Vertical.
If the camera is unavailable because another application has exclusive access, close that application’s camera session and reconnect the Cutscene source. Camera availability is a capture issue; resizing the layer will not fix a camera stream that never connected.
5.4 Microphone and audio sources
A Mic / Audio source is an independent audio input. Use separate sources for signals you may want to control independently, such as a microphone and a voice-chat/mixer bus.
Name audio sources according to what they contain rather than the hardware model. Mic, Discord, Game Mix and Music are easier to understand later than device-driver names, especially if you enable editable source export and see those tracks in post-production.
Before a long session, watch the meter while speaking normally and during a louder reaction. A meter that never moves usually means the wrong input is selected or permission is missing; a meter that constantly hits the maximum suggests the signal is too hot before it reaches Cutscene.
5.5 Media files
Choose Media file to add an image or video to the live scene. Video media can loop, making it useful for animated overlays or repeating background elements.
Remember that a media file referenced by a profile remains an external file. If you move or delete it later, Cutscene cannot recreate it from the profile definition. Store persistent scene assets somewhere stable rather than in a temporary downloads folder.
5.6 Text and fonts
Choose Text to create an editable text layer. Edit the wording and styling through the source controls. Cutscene can use installed fonts, supported Google Fonts and imported custom fonts.
For Google Fonts, install the font through Cutscene before relying on it in a scene. For a custom font, keep the source font file available if you later rebuild the machine or move the profile elsewhere.
Use the text preview background preference when light or dark text is difficult to judge while editing; it is an editing aid, not part of the final recorded scene.
5.7 Rename, hide and lock sources
Rename sources early, particularly in profiles with more than one screen, camera or audio input. Meaningful names flow into later management and make the Layers panel easier to understand.
Use Hide/show when an element should remain in the profile but temporarily disappear. Use Lock when an element is correctly positioned and you want to avoid moving it accidentally while editing other layers.
Locking is especially helpful for logos, frames and established camera positions. Unlock only when you deliberately intend to change the composition.
6. Building the Horizontal and Vertical compositions
6.1 Choosing what you are editing
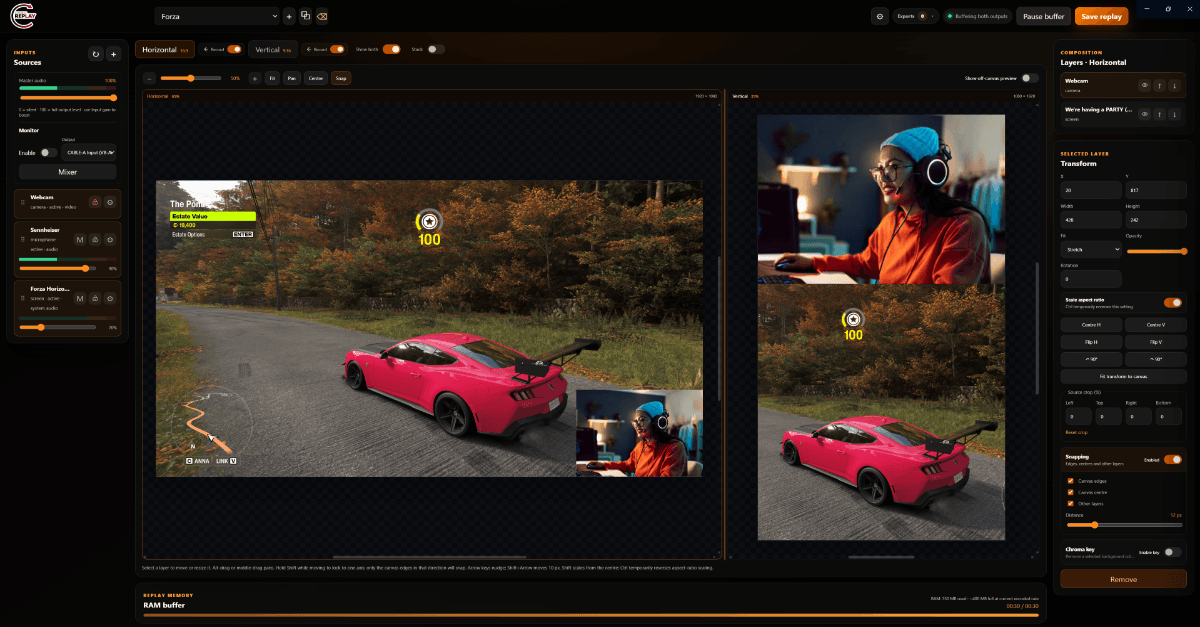
At the top of the preview area, select Horizontal or Vertical to make that canvas active. With Show both enabled, both canvases remain visible while one is still the active editing target. Stack switches the dual-preview arrangement so the two outputs appear top-and-bottom rather than side-by-side.
If you are doing precise placement, it can be easier to temporarily turn Show both off, edit one canvas at a larger size, then switch to the other. Turning the second preview off does not disable its recording; the per-canvas Record toggle controls capture participation.
6.2 Moving and resizing a layer directly
Select a visual layer in the preview or Layers panel. Drag it to move it and use the resize handles to change its size.
For fine positioning:
- arrow keys nudge the selected layer;
- Shift+Arrow moves it by 10 pixels;
- holding Shift while dragging constrains movement to one axis;
- holding Shift while resizing scales from the centre; and
- Ctrl temporarily reverses the current aspect-ratio scaling behaviour.
Use direct manipulation for approximate placement, then use the numeric Transform fields when exact position or dimensions matter.
6.3 Transform controls
The right Transform panel exposes X, Y, Width, Height, Fit, Opacity and Rotation. It also provides quick actions such as Centre H, Centre V, horizontal/vertical flip, 90-degree rotation, Reset source size and Fit transform to canvas.
A useful workflow is:
- add the source;
- use Fit transform to canvas as a predictable starting point;
- choose a Fit mode that matches the intended treatment;
- crop away unwanted areas; and
- fine-tune X/Y and size.
Avoid using Stretch unless distortion is genuinely intentional. Cover and Contain preserve the source proportions and are safer starting points for gameplay and cameras.
6.4 Cropping and aspect-ratio scaling
Crop controls remove percentages from the left, top, right and bottom of the source before it is placed in the scene. This is particularly useful for Vertical layouts where only the action area of a wide game frame needs to remain visible.
Crop first, then size and place the remaining image. If you constantly resize first and crop later, it is easier to lose track of why the source appears larger or smaller than expected.
Enable Scale aspect ratio when you want width and height to stay proportional. Hold Ctrl temporarily when you need the opposite behaviour for a single resize.
6.5 Layer order
The Layers panel controls front-to-back order. When two sources overlap, the one higher in the visual stack appears in front.
For a typical scene, gameplay is near the back, with camera frames, logos or text above it. Reorder deliberately rather than compensating with strange crops or positions.
Layer order belongs to the active canvas. Horizontal and Vertical can therefore use different stacking where that makes sense.
6.6 Snapping
Snapping helps align a layer with canvas edges, the canvas centre or other layers. The Transform panel lets you enable each snap target and choose the snap distance. The preview toolbar also contains a quick Snap toggle.
Use a smaller snap distance for precise layouts and a larger one when you want elements to catch alignment guides easily. If snapping gets in the way during a one-off move, temporarily disable it rather than fighting the cursor.
Fresh installations have snapping enabled by default.
6.7 Zoom, pan and off-canvas preview
Preview zoom changes how large the editing canvas appears on screen; it does not change the recorded resolution. Use Fit to return the active canvas to a useful full view.
Use Pan to move around a zoomed workspace. Alt-drag or middle-drag can pan without permanently selecting the Pan tool. Centre recentres the active recording canvas.
Enable Show off-canvas preview when you need to see portions of a layer extending beyond the recording frame. This is useful while animating or intentionally positioning content partly outside the final canvas.
6.8 Output resolution, background and recording participation
Each canvas has its own width, height, background colour and Record setting under Settings → Recorder → Output canvases.
Changing output dimensions affects the real capture output, unlike preview zoom. Make resolution changes before finalising a layout because the canvas geometry changes underneath your layer positions.
If one canvas is disabled with its Record toggle, it can remain a stored composition in the profile without creating that output during new replay saves.
7. Setting up audio
7.1 Per-source volume and meters
Use the source meters to establish whether each input is present before adjusting tone or dynamics. Set a sensible source volume balance so a microphone and game/system audio can coexist without one masking the other.
Volume is an output balance control. If an input is fundamentally too quiet before it reaches the mixer, use Input gain or fix the source/device level rather than simply pushing every downstream level to maximum.
7.2 Master output and monitoring
The Master audio panel controls the combined Cutscene output level and displays the master meter. This is the level that represents the overall mix feeding the recorded output.
To listen to the complete Cutscene mix, enable Monitor and choose the desired output device. Monitoring is useful for setup, but be careful with microphones and speakers: monitoring a live microphone through open speakers can create feedback. Headphones are safer for checking the full mix.
7.3 Input gain
Use input gain when a source arrives at an unsuitable level. Increase it gradually while watching the meter. Excessive gain raises noise as well as useful signal, so a very quiet microphone is better fixed at the device/interface stage where possible.
Set gain before compressor and gate tuning. Dynamics processors behave differently if you substantially change the input level afterwards.
7.4 Compression
Compression reduces the difference between louder and quieter parts of a source. It is most useful on speech that varies in level or on a signal with occasional peaks.
Start conservatively:
- enable the compressor;
- set a threshold so normal speech only begins to trigger compression on louder phrases;
- use a moderate ratio rather than the maximum;
- use a short enough attack to control peaks without flattening every consonant; and
- use a release that returns naturally between phrases.
If speech starts to sound crushed or unnaturally constant, back off the ratio or lower the amount of time the signal spends above the threshold.
7.5 Noise gate
A noise gate reduces low-level room or equipment noise when the source falls below its threshold.
Set the threshold while you are silent, then speak quietly. The gate should remain closed on unwanted background noise but open reliably on the beginning of speech. If first syllables disappear, lower the threshold or adjust attack behaviour. If the gate chatters open and closed between words, revisit threshold and release.
A gate does not remove noise while you are actually speaking. Use it to tidy silent gaps, not as a substitute for microphone placement or noise reduction at the source.
7.6 Equalizer and normalization
The three-band equalizer provides Low, Mid and High adjustments. Make small changes while listening to real programme material. Large boosts can create clipping or make a microphone harsher than before.
Where normalization is available, choose Peak when you mainly want to control the highest level, Loudness when you want a more consistent perceived target, or Off when you want the original dynamics preserved. Normalization is not a replacement for a badly balanced live mix; it is a finishing/consistency tool.
7.7 Bypass processors when comparing
Audio processor toggles allow a processor to be enabled or bypassed independently. Use bypass to compare processed and unprocessed sound at similar listening volume. This is much more informative than changing several parameters and trying to remember the original result.
8. Replay buffer, quality and saving clips
8.1 Starting and stopping the replay buffer
Use Start buffer in the top-right of the recorder to begin the rolling replay window. The status pill and RAM buffer display show whether capture is active and how much of the configured window has accumulated.
Stopping the buffer means new moments are no longer entering replay memory. Existing saved clips are unaffected.
If you enable Start buffer when opened in Application settings, Cutscene can begin automatically when the application starts. Keep the status check in your routine anyway, especially after settings changes or device reconnection.
8.2 Choosing replay duration
Replay duration is under Settings → Recorder → Shared recording settings. Available choices run from short highlight windows up to longer replay intervals.
Choose the shortest duration that reliably includes the context you care about:
- 15–30 seconds: quick kills, reactions and isolated moments;
- 60–90 seconds: general gameplay highlights with some lead-in; and
- 2–2.5 minutes: conversations or sequences where the setup matters.
Longer buffers consume more memory because more encoded material and, when enabled, more editable source material must remain available. If you trim away most of every saved clip, shorten the duration. If the beginning of the story is repeatedly missing, lengthen it.
8.3 FPS and bitrate
FPS and bitrate are shared across the two outputs. A fresh installation uses 60 FPS and 24 Mbps.
Use 60 FPS for fast gameplay where motion clarity matters and your hardware handles it comfortably. Lower frame rates reduce workload and may be adequate for desktop/tutorial content.
Bitrate controls how much encoded data is available for image detail. Higher is not automatically better if the source resolution or publishing platform does not benefit. If you see encoder overload or unnecessary file sizes, reduce bitrate only after confirming the source and resolution are otherwise appropriate.
8.4 Encoder preference
Automatic is the normal starting point. Prefer hardware asks Cutscene to use hardware encoding where suitable and is generally the fastest choice. Prefer software is available when GPU encoder drivers are unstable or a particular machine behaves better with CPU-based encoding.
The hardware capability note in Recorder settings describes the detected performance profile. Treat it as guidance rather than a substitute for a real test replay on your actual game and sources.
8.5 Post-save capture delay
Post-save delay controls whether Cutscene waits after the save command before freezing the replay endpoint. This allows a saved clip to include a short amount of footage after you press the button.
The default is Off, which is ideal when you want the replay to end at or near the moment you consciously save it. Enable a delay when your workflow benefits from capturing the reaction immediately after the event.
While a delayed endpoint is still being captured, recorder settings can become temporarily read-only to avoid changing the capture configuration halfway through that clip.
8.6 Save Both, Horizontal or Vertical
The main Save replay button saves the normal dual-output replay according to the enabled canvases. Global hotkeys also let you save both, Horizontal only or Vertical only.
Use both for moments likely to be reused across long-form and short-form platforms. Use a single-output hotkey when you already know the moment only makes sense in one format or when you deliberately disabled one canvas for that profile.
Saving a replay freezes that moment immediately for the export queue; the live buffer can continue while file processing happens in the background.
8.7 Export activity and queue capacity
Select Exports in the top bar to open Export activity. It shows queue slots used, concurrency, available capacity and each captured job.
The replay queue supports up to ten captured clips. Processing is intentionally serial/conservative so background work does not compete excessively with the live recorder. If you save several clips quickly, they can remain queued while you continue playing.
Use Clear finished to remove completed history from the activity view. This does not delete the saved clip files.
8.8 Fast processing, repair and full normalisation
When editable source export is enabled, the default fast path remuxes healthy media without unnecessarily decoding and re-encoding it. Cutscene inspects timestamps and shared overlap; files that are unsafe can be repaired individually.
Enable Fully normalise editable exports when you specifically want every editable file re-encoded onto a standardized zero-based constant-frame-rate timeline. This is slower and heavier, but can be useful for difficult external-editor workflows.
Do not enable full normalisation simply because it sounds “higher quality”. The fast path is intended to preserve healthy encoded media with less work. Use normalisation for compatibility/consistency needs rather than as a universal quality switch.
9. Saving editable Source Footage
9.1 Decide whether you need a source package
Under Settings → Recorder → Clip folder, Export editable source files tells Cutscene to retain independent screen, camera and audio recordings alongside the replay. This is optional.
Leave it off when your priority is the fastest, simplest compiled replay workflow and you rarely need to reconstruct the scene later. Turn it on when you want to reframe individual cameras/screens, rebalance separate audio sources or send the capture to an external NLE.
Because source files also have to exist in the rolling replay window, enabling this mode uses more memory and creates more output files.
9.2 Compiled clips and source files are separate choices
Export compiled clips controls whether Cutscene writes the ready flattened Horizontal/Vertical clips. It is enabled by default.
For most creators, the useful configuration is compiled clips on plus editable source files only when needed. This gives you an immediate shareable replay and a deeper-edit package for clips that deserve more work.
If compiled export is turned off, editable source export must remain on so a save still produces usable output.
9.3 What the source package contains
A valid source package can include independent visual recordings, independent audio recordings and a capture manifest describing how the files relate to the replay interval. The source and compiled replay are aligned to the same captured time window.
That manifest is important inside Cutscene: the Clip Editor only exposes Source Footage when the clip has a valid source package and the required visual source files can actually be resolved on disk.
Moving or deleting source files can therefore make Source Footage unavailable for that clip even though the compiled replay still opens normally.
9.4 XML interchange
Editable source export can write timeline interchange information for external editors. The normal editable workflow includes FCPXML-style data suitable for applications such as Final Cut Pro and DaVinci Resolve. Also export compatible XML adds the compatible XML version used by supported workflows such as Adobe Premiere Pro, OpenShot or Lightworks.
Enable the extra XML only when your external editor/workflow needs it. It depends on editable source export and has no value for a compiled-only replay.
9.5 Default editor mode
When editable source export is enabled, Settings → Application → Workspace → Always open editor in Source Footage mode can make eligible clips open directly in the source project.
The option is hidden completely when source saving is off because it could not affect future clips. Even when the preference is enabled, a particular clip still opens as Rendered Clip if its source package is missing or invalid.
10. Using the Clip Library
10.1 Open and understand the library
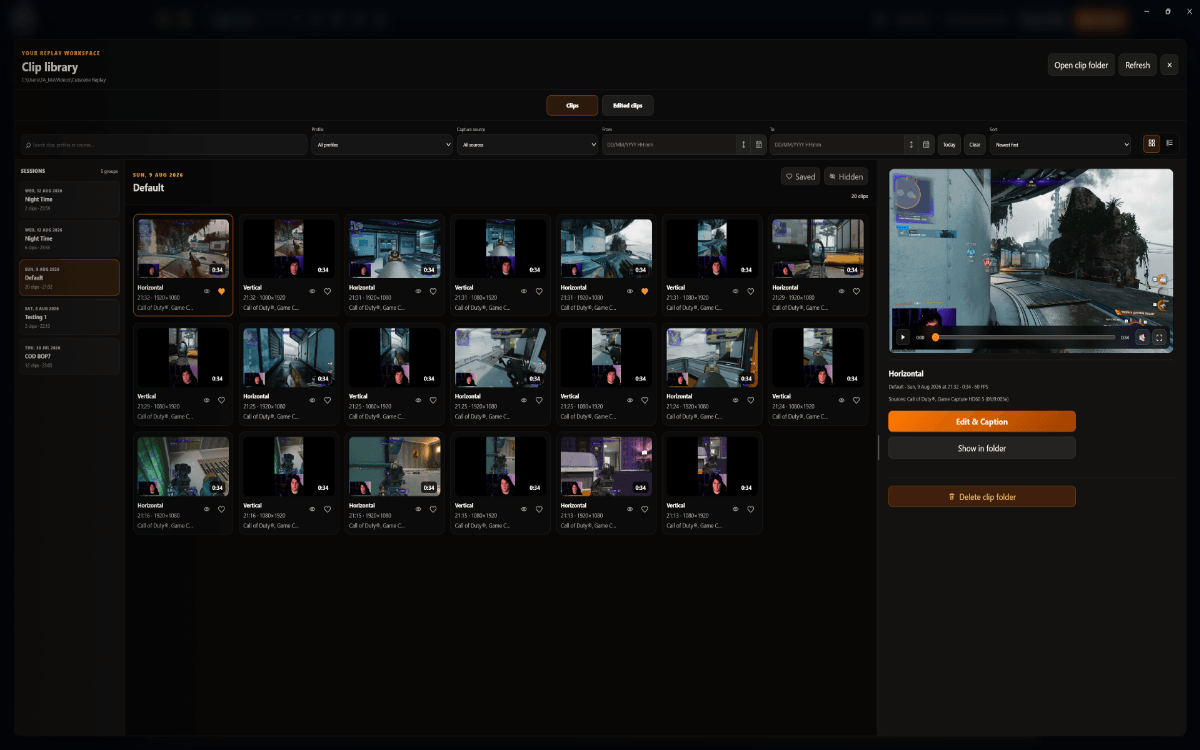
Select Clip library above the recorder preview. The Library has two main tabs: Clips for captured replays and Edited clips for finished outputs created by the Clip Editor.
The path at the top shows the current clip folder. Open clip folder opens that location in Windows, while the refresh button asks Cutscene to rescan the library.
10.2 Search and filter a large library
Use the search box to search clips, profiles or sources. You can also filter by Profile and Capture source, set From/To local date-times, use Today, and sort newest-first or oldest-first.
The left Sessions area groups related captures so you can narrow the visible set without manually creating a folder tree for every session.
Use Saved to focus on clips you have marked for keeping. Hidden shows clips that have been intentionally hidden from the normal view. This replaces the need to treat every clip as either permanently important or deleted immediately.
10.3 Grid and list view
Use Grid view for visual browsing when thumbnails help you recognise a moment. Use List view when names, time and metadata matter more than large thumbnails or when you are processing many clips systematically.
The view changes presentation only; it does not move or duplicate any files.
10.4 Preview before editing
Select a clip to load the preview panel. Use play/pause, seek, mute and fullscreen/theatre controls to verify the moment before opening the editor.
This is the fastest triage step. If the replay is already ready to publish, you may not need the editor. If the wrong capture is selected, find the correct one here rather than creating an unnecessary edit project.
10.5 Bulk selection and deletion
Select Select to enter bulk-selection mode, choose multiple clips, use Select all where appropriate and then Delete selected. Cutscene asks for confirmation before destructive bulk deletion.
Use bulk deletion after you have reviewed a session rather than during capture. Keeping capture and cleanup as separate tasks reduces the chance of deleting a moment before you have properly previewed it.
10.6 Partner clips
When Horizontal and Vertical files were saved from the same replay, Cutscene stores partner metadata so the Library and Editor can recognise them as the same moment in different formats.
Partner navigation lets you move to the matching output without searching by filename. After editing one format, Copy edit to partner can transfer compatible edit work so you do not have to rebuild the entire project manually. Review the result after copying because different aspect ratios can still require different visual positioning.
10.7 Refreshing and clearing library cache
Use the Library refresh button when new files exist but the current view has not updated. If derived library data becomes stale or orphaned, use Settings → Application → Clip library cache → Clear clip library cache.
The cache clear is a maintenance action; it is not a “delete my clips” button. Existing clips, edited exports and history still linked to real clips are preserved while derived cache/orphaned internal data is rebuilt or removed.
11. Opening the Clip Editor
11.1 Open a clip for editing
Select a clip in the Library and choose Edit & Caption. The editor opens with the video preview, timeline, captions panel and selection-aware inspector.
Start by playing the clip once from beginning to end. Decide what actually needs changing before reaching for effects or keyframes. Most highlight edits are easier when you first establish the useful time range, then make presentation changes.
11.2 Rendered Clip versus Source Footage
At the top of the editor, Rendered Clip edits the flattened replay as it was captured. Source Footage reconstructs eligible independent recorded sources.
Use Rendered Clip for fast trimming, captions and ordinary edits where the captured composition is already correct. Use Source Footage when you need to change individual source transforms or work with separate recorded inputs.
If the Source Footage button is disabled or absent for a particular clip, Cutscene did not find a valid usable source package for that clip. This is deliberate; it prevents presenting an editor mode that would open with missing media.
11.3 Resize the editor around the current task
The editor sidebars and timeline can be resized. Collapse an inspector/sidebar when you need more preview space. On smaller windows, inspector tabs scroll rather than disappearing.
Use Detach timeline when a second monitor is available or when the embedded timeline does not provide enough vertical space for a multi-track project. The detached timeline remains part of the same edit project; it is not a separate copy.
11.4 Playback and project state
Use the editor play control or timeline transport to preview changes. The timeline includes rewind/forward by five seconds, exact time readouts and a playhead you can scrub directly.
Undo/redo applies to editor/timeline changes. Cutscene also persists the edit project so timeline, captions, keyframes and processing changes remain available when you return to the clip later.
12. Timeline editing
12.1 Selecting tracks and blocks
Click a track/block to make it the active editing target. The selected track information panel is highlighted and the inspector changes to the controls relevant to that selection.
When the project has many rows, scroll vertically through the timeline. The ruler/playhead header remains attached to the timeline ruler rather than disappearing with the track content.
12.2 Scrubbing and exact playhead positioning
Click or drag on the timeline ruler to scrub. For frame-accurate or repeatable operations, use the Playhead field in the tools bar and enter a time as MM:SS.mmm or seconds.
A reliable edit workflow is to position the playhead first, then use trim/cut tools. This avoids trying to drag an edge to an exact number by eye.
12.3 Trimming a segment
Drag the neutral handles at the left or right edge of a segment to trim it. Timeline snapping helps the edge meet the playhead or other useful boundaries.
Alternatively, position the playhead and use Trim left to playhead or Trim right to playhead. This is often faster for removing a known amount from the beginning or end.
Trimming changes the visible portion of the media; it does not need to destroy the underlying source range. For imported/source media where the complete range remains available, the editor can offer Restore source range.
12.4 Cutting/splitting at the playhead
Select the block, move the playhead to the intended cut and choose Cut at playhead. You now have separate sections that can be trimmed, moved, deleted or used as a transition boundary.
Make cuts for a reason: removing dead air, isolating a section for an effect, or creating a deliberate transition point. Excessive cuts make the timeline harder to manage without improving the result.
12.5 Joining and breaking joins
Select compatible adjacent sections and use Join selected clips as positioned when you want them treated as a historical join. Break historic join restores the pre-join sections where that join history exists.
Joining is not the same thing as applying a transition. A transition controls how two visual sections blend across a boundary; joining controls the structural relationship of timeline sections.
12.6 Deleting timeline content
Select the video/media/audio block and use the relevant remove/delete action in the inspector. Video deletion removes that selected section while preserving the remaining timeline content.
Track deletion is a bigger structural action and presents a warning. Use it when the entire track no longer belongs in the project, not merely when one segment should disappear.
12.7 Timeline snapping and Alt override
Magnetic timeline snapping is enabled from the magnet tool. It helps blocks, cuts and other edit boundaries align to nearby timeline targets.
Hold Alt while dragging when you need to temporarily override snapping. This is faster than switching snapping off and forgetting to re-enable it.
12.8 Timeline zoom and length
Use −, + and Fit to change the timeline scale. Zoom in for precise cuts/keyframe work and out to understand the whole project.
The Length field sets the project timeline length. Trim timeline to latest content shortens the timeline to the end of the latest clip or track so you do not accidentally export a long empty tail.
12.9 Adding tracks, media and audio
The timeline toolbar includes Add track, Add media and Add audio.
Add a new track when the existing row structure does not fit the edit you are building. Add media for an image/video overlay or B-roll element. Add audio for music, voiceover or another external audio file.
After adding content, place it in time first, then tune transforms/effects/volume. It is easier to judge styling when the item already occupies the correct part of the edit.
12.10 Renaming, hiding and resizing tracks
Track rows can be renamed so their role is obvious. Visibility toggles let you temporarily hide visual tracks without deleting them, which is useful when comparing compositions.
Drag track-height controls to give a complex track more vertical room. In a detached timeline, resizing behaves independently for that editor session while the overall window remains available to the track list.
13. Timeline filmstrip previews
13.1 What the thumbnails are for
Video tracks can show filmstrip thumbnails to make navigation easier. The Frames control specifies how many preview divisions Cutscene should show across the visible timeline area, up to 60.
Increase the count when visual detail helps you locate a moment; decrease it when you want a cleaner timeline or when thumbnail detail is not useful for the current edit.
13.2 Applying a new frame-preview density
Change the Frames value, then choose Apply. The visible geometry updates and Cutscene progressively prepares thumbnails.
The thumbnail system intentionally prioritises a low-resolution first pass for the visible region, then refines it when the view settles. Adjacent regions can prepare in the background so scrolling does not require every thumbnail to begin from zero.
13.3 Playback versus thumbnail generation
Thumbnail decoding is suspended during active playback so the filmstrip worker does not compete with smooth preview playback. If high-resolution thumbnails appear to refine after you stop playback, that is expected behaviour rather than a sign the video itself is low quality.
14. Visual and audio keyframes
14.1 What keyframes do
Keyframes tell Cutscene that a property should have a particular value at a particular time. The editor then interpolates between points where appropriate. Visual keyframes can animate Position X/Y, Width, Height, Scale, Rotation and Opacity on rendered video, Source Footage tracks and imported media.
Use keyframes when a change should evolve over time. If a layer should remain at one size for the whole clip, set the normal transform instead of creating redundant animation points.
14.2 Add a manual visual keyframe
A straightforward animation workflow is:
- select the visual track;
- expand the relevant keyframe property lane;
- select the property or properties you intend to animate;
- move the playhead to the starting time;
- set the starting transform value;
- press Add keyframe at playhead (shortcut K where active);
- move the playhead to the ending time;
- change the property to the ending value; and
- add the second keyframe.
Play the section and adjust timing before adding more points. Two well-placed keyframes are easier to understand than ten unnecessary ones.
14.3 Auto Keyframe mode
Enable Auto keyframe when you are deliberately animating and want property changes at the playhead to create or update keyframes automatically.
Turn it off when you return to ordinary static editing. Leaving Auto Keyframe enabled while casually repositioning something can create animation you did not intend.
14.4 Selecting and moving keyframes
Click a marker to select it. Shift-click property rows or markers to build a multi-selection. Drag a marquee through the keyframe lane to select several markers spatially.
Once multiple keyframes are selected, dragging them moves the group while preserving their spacing. Markers can move across split boundaries on the same track where the underlying animation remains valid.
Unselected markers remain neutral; the accent colour is reserved for selected keyframes, which helps you see exactly what a group operation will affect.
14.5 Copy, paste, delete and exact timing
Use copy/paste to reuse a set of selected animation points. Paste places the copied keyframe data relative to the current editing context/playhead.
Delete removes the selected keyframes without deleting the media segment. For precise timing, edit the keyframe time rather than relying on a long drag at a highly zoomed-out scale.
Keyframes are designed to survive ordinary split and trim operations when their timing remains relevant to the retained media.
14.6 Linear and Hold interpolation
Use Linear when the property should move smoothly between two values. Use Hold when a value should remain unchanged until the next keyframe and then switch.
Examples:
- a smooth zoom from 100% to 130% → Linear;
- an overlay that should remain fully visible, then instantly disappear → Hold on opacity; and
- a camera framing that jumps between two deliberate positions → Hold may be more appropriate than a visible slide.
14.7 Volume keyframes
Audio tracks support Volume keyframes. Select an audio track and use the Audio Keyframes inspector to add/navigate volume points, adjust the selected value with its slider and choose interpolation.
A common use is ducking music under speech:
- add a point shortly before speech starts at the normal music level;
- add a second point at the speech start with the lower level;
- keep the lower level through the spoken section;
- add a point near the end of speech; and
- return to the normal level just after it ends.
Use Linear for fades and Hold for deliberate stepped level changes. Volume automation is persisted with the edit project and remains associated correctly through supported split/trim operations.
15. Visual effects, transitions and imported media
15.1 Applying effects
Select a visual block and open the visual effects inspector. Effects are stackable, so more than one can be applied to the same item.
Available effects include brightness, contrast, saturation, hue shift, grayscale, sepia, blur, exposure, vibrance, warmth, matte fade, vignette, cinematic bars and soft glow. Each effect has an adjustable amount where appropriate.
Add one effect at a time, play the relevant section, then decide whether another is actually needed. Several moderate effects usually produce a cleaner result than extreme settings stacked together.
15.2 Reordering, bypassing and removing effects
Effect order matters because each stage receives the result of the previous stage. Reorder effects when the combination behaves differently from what you expected.
Use the visibility/bypass control to compare the effect stack without destroying its settings. Remove an effect only when you no longer need it. Effect configuration persists with the edit project.
15.3 Adding a transition
Transitions live on a boundary between compatible adjacent visual sections. First create/select a cut boundary, then open Transitions in the inspector.
You can click a transition for the selected cut or drag a transition card onto a cut. Available transition types include Cross Dissolve, Smooth Dissolve, Dip to Black, Dip to White, Dip to Grey, Soft Black Blend and Soft White Blend.
15.4 Transition duration and fine tuning
After applying a transition, adjust Duration. Open Fine tuning when you need Easing, Balance, Overlay intensity or Blend colour.
Start with the default duration and only lengthen it if the edit benefits. Long dissolves can make a fast gameplay highlight feel sluggish.
Cross Dissolve uses source handles beyond the cut. If the neighbouring sections do not contain enough unused source footage, Cutscene limits the transition duration rather than inventing frames. If you cannot make the transition as long as expected, check how tightly the adjacent clips have already been trimmed.
15.5 Imported images and video
Use Add media to import an image or video into the editor. Imported media has its own timeline block and can use transforms, opacity, visual effects and visual keyframes.
For a logo or static graphic, place the block across only the part of the timeline where it should appear. For an imported video, trim its timeline range and use its filmstrip to locate content just as you would with other visual footage.
Use Restore source range when available if you trimmed the imported/source media and later want its complete source range back without discarding transforms, effects or keyframes.
16. Captions
16.1 Choose what audio to transcribe
In the editor’s Settings caption tab, choose Caption source. Mixed Clip Audio transcribes the audible rendered mix. When original recorded sources or added editor audio tracks are available, they can also appear as transcription sources.
Choose the cleanest source containing the speech you actually want captioned. If the game/music mix makes speech hard to hear but a separate microphone source exists, transcribing that microphone is usually more accurate than transcribing the final mix.
You can use Add audio to bring another audio file into the editor and make it available for the project/transcription workflow.
16.2 Generate captions locally
Choose the spoken language or Auto detect, then select Generate captions. Caption generation runs locally using the packaged transcription workflow rather than requiring you to upload the clip to a third-party caption website.
Generation is the first draft, not the final publication step. Names, game terminology and noisy speech should always be reviewed.
16.3 Review wording and cue timing
Open Review captions after generation. Read every cue while playing the relevant section. Correct wording, punctuation and timing where necessary.
When you are satisfied with the generated/reviewed cues, use Add to timeline. Caption instances are attached to the edited video timing and remain aligned as supported timeline edits change the project.
If you regenerate from another audio source, review the new result again rather than assuming it is automatically better.
16.4 Style captions
Caption style controls include installed font, Google Font installation, custom font import, font size, weight, line height, letter case, text colour, outline colour/width, background colour/opacity, horizontal/vertical padding and background radius.
Build readability before decoration:
- choose a clear font and size;
- ensure foreground text contrasts with both bright and dark footage;
- use an outline or semi-opaque background when the footage changes frequently; and
- only then tune weight, radius and other aesthetic details.
A style that looks attractive on a paused dark frame can become unreadable over a bright explosion. Preview several points in the clip.
16.5 Position captions
Choose Bottom, Centre, Top or Custom positioning. In Custom mode, drag the caption within the video preview. Snap guides help align it while moving.
For Vertical content, keep captions clear of important faces/game UI and remember that social-platform controls often occupy the lower and side edges of the screen. For Horizontal, avoid covering subtitles, game HUD or lower-third overlays already present in the source.
16.6 Copy captions to the partner output
When a matching Horizontal/Vertical partner exists, caption work can be copied to the partner clip. This saves transcription and text-review time.
After copying, inspect placement and line wrapping in the second aspect ratio. The wording/timing may transfer cleanly while the visual position needs a platform-specific adjustment.
17. Exporting the finished edit
17.1 Export the current project
When the edit is ready, choose Export clip in the editor header. The current timeline, effects, keyframes, transitions, audio processing and captions are rendered into a finished edited output.
Before exporting, play the project from the beginning and check the final few seconds in particular. Empty timeline after the last content can create unwanted duration, so use the timeline trim-to-latest-content control where appropriate.
17.2 Edited export queue
The editor has its own Exports activity control. It reports how many edited jobs are queued/exporting, how many are finished and how many queue slots remain.
You can continue working while an export is tracked, but avoid making assumptions about a file that is still in progress. Wait for the job to report completion before publishing or moving the output externally.
17.3 Stop/cancel an edited export
Use the stop control when you deliberately want to cancel an in-progress edited export. Cancelled output is cleaned up so an incomplete file/folder is not presented as a finished result.
Stopping an export does not destroy the edit project. Correct the issue and export again.
17.4 Find the result
Finished editor renders appear in the Edited clips section of the Clip Library rather than being mixed into the normal captured Clips list.
Use Show edited from a source clip where available to move quickly to its finished output. This separation lets you keep the original replay as a clean source while creating several edited versions over time.
18. Troubleshooting common workflows
18.1 “I pressed the hotkey and nothing was saved”
Check in this order:
- Is the replay status actually buffering?
- Has the buffer accumulated footage yet?
- Is the relevant Horizontal/Vertical Record toggle enabled?
- Does the shortcut still appear under Settings → Recorder → Hotkeys?
- Does the hotkey work while the game has focus?
- Is the trial/licence currently authorised for capture?
- Is the export queue at capacity?
This sequence distinguishes capture-state problems from shortcut problems and export-queue problems.
18.2 “The game is visible but there is no game audio”
A screen/window picture can connect even if Windows did not expose system audio. Confirm audio is playing, inspect source/audio meters, then reconnect the screen source. If you intentionally use a separate mixer/device for game audio, add/select the appropriate Mic / Audio input instead of relying on desktop loopback.
18.3 “My webcam or window disappeared”
Use Refresh sources and the source reconnect action. Reopen the game/window or release the camera from another application if necessary. Cutscene tracks availability, but it cannot capture a device or window that no longer exists in Windows.
18.4 “Recording performance became unstable”
Reduce variables systematically. Close the editor if it is open, test the current source at the existing settings, then consider FPS/bitrate or encoder preference.
If the GPU encoder/driver appears unstable, test Prefer software. If the CPU is the bottleneck and hardware encoding is available, use Automatic or Prefer hardware. Avoid changing resolution, FPS, bitrate, source count and encoder all at once because you will not know which change fixed or worsened the problem.
The Pause replay buffer while the editor is open option can free recording resources during editing and automatically resume the buffer afterwards if it had been running before the editor opened.
18.5 “Source Footage is missing”
Source Footage appears per clip, not merely because the global setting is currently enabled. The clip must have been captured with editable source export and its valid source/manifest files must still exist.
A compiled-only clip remains editable in Rendered Clip mode. Turning source export on today does not retroactively create independent source recordings for an older replay.
18.6 “The Clip Library looks stale”
First press the Library refresh button. If derived metadata still appears wrong, clear the Clip Library cache from Application settings. Do not delete the clip folder just to force a rebuild.
18.7 “Timeline thumbnails are incomplete while playing”
Thumbnail generation intentionally pauses during active playback. Stop playback and allow the visible filmstrip to refine. This does not affect export quality or the underlying video.
18.8 “A transition will not become longer”
Cross Dissolve and similar source-aware transitions need unused footage around the cut. If both sides are tightly trimmed, there may be no additional source handle available. Shorten the transition or restore/extend the adjacent source range where possible.
18.9 “Cutscene says Replay paused — trial ended”
The recorder is intentionally blocking new capture because the entitlement state is expired. Existing library content remains available. Activate from the expiry screen or Settings → Licence after obtaining a licence.
19. Recommended creator workflows
19.1 Fast gameplay highlight workflow
For a low-friction gameplay session:
- open the correct profile;
- confirm the game/window source and audio meters;
- verify both canvas layouts;
- press Start buffer or confirm automatic buffering;
- play normally;
- use F8 after an interesting moment;
- continue playing while Export activity processes the clip;
- review clips later in the Library; and
- edit only the moments that genuinely need work.
This keeps creative attention on gameplay instead of the recorder.
19.2 Horizontal + Vertical publishing workflow
Set up each aspect ratio before the session. Keep gameplay full-frame or conventionally composed on Horizontal. On Vertical, crop/reposition the gameplay and camera so the important action uses the tall frame effectively.
Save both outputs with F8. In the Library, open the more important platform version first. Complete timing/caption work, copy compatible edits/captions to the partner, then adjust framing and placement for the other aspect ratio before exporting both.
19.3 Deep-edit Source Footage workflow
Enable Export editable source files before the session when you know you may want source-level control.
Capture normally. In the Library, open an eligible clip and switch to Source Footage. Trim the story first, then change individual visual tracks, rebalance audio, animate source transforms or add media. Export the finished result while keeping the compiled replay available as a quick reference/version.
19.4 Tutorial/desktop workflow
For a software tutorial, use a specific application window where possible and enable cursor capture if supported and useful. Add a microphone separately so narration remains controllable. Use a longer replay duration if the important explanation starts well before the mistake/demo moment you decide to save.
In the editor, trim pauses, generate captions from the cleanest narration source and use imported media/text sparingly to clarify rather than decorate.
19.5 Building a reusable profile library
Once one scene works reliably, duplicate it to create variants. Keep one clean base profile for each major game/workflow and create duplicates for special camera or overlay arrangements.
Periodically bulk-export the profile set as a backup. Store permanent media assets in stable folders so imported profiles can reconnect to them later.
20. Frequently asked questions
20.1 Does Cutscene record my entire session to disk?
Not in the normal replay workflow. Cutscene maintains a rolling recent window in memory and writes a persistent clip when you save a replay. Optional editable source capture keeps additional source data for that same replay workflow; it is not intended to create an endlessly growing full-session recording.
20.2 Can I change the default 30-second replay duration?
Yes. Open Settings → Recorder → Shared recording settings → Replay duration, choose the desired window and save Recorder settings.
20.3 Can I record only Horizontal or only Vertical?
Yes. Disable the unused canvas using its Record toggle, or use the Horizontal-only/Vertical-only save hotkeys for an individual capture.
20.4 Does Show both mean both outputs are being recorded?
No. Show both controls preview layout only. The per-canvas Record toggles determine whether an output participates in replay recording.
20.5 Can Horizontal and Vertical have different layouts?
Yes. That is a core Cutscene workflow. They share the capture session but retain independent composition state, resolution, background and source arrangement.
20.6 Can I edit the camera separately after capture?
Only when that clip has valid editable Source Footage containing the independent camera source. A compiled-only replay is flattened and is edited as Rendered Clip.
20.7 Why is “Always open editor in Source Footage mode” missing from Settings?
The option is hidden when editable source export is disabled because newly captured clips cannot use that preference. Enable Export editable source files and save Recorder settings first.
20.8 Why does an older clip still have no Source Footage after I enable source export?
The setting applies when the replay is captured. Cutscene cannot reconstruct independent recordings that were never saved for an older compiled clip.
20.9 Can I keep both the ready replay and editable sources?
Yes. Leave Export compiled clips enabled and also enable Export editable source files.
20.10 What is the difference between fast remux and full normalisation?
The fast path reuses healthy encoded media directly where possible and repairs only files whose timing/overlap is unsafe. Full normalisation deliberately re-encodes every editable source onto a standard constant-frame-rate timeline. Use the latter for compatibility/standardisation needs, not simply because it sounds more thorough.
20.11 Can I use a second monitor for the editor timeline?
Yes. Use Detach timeline in the Clip Editor, then place the timeline window on the other display.
20.12 Can I animate a zoom or move?
Yes. Use visual keyframes on Scale and/or Position X/Y. Add a starting and ending keyframe and use Linear interpolation for a smooth move.
20.13 Can I animate audio volume?
Yes. Audio tracks support Volume keyframes with navigation, retiming, copy/paste and interpolation controls.
20.14 Are captions generated online?
Caption generation is designed to run locally using Cutscene’s transcription workflow. You can transcribe Mixed Clip Audio or another available audio source and then review the result before adding it to the timeline.
20.15 Where do exported edits appear?
Finished Clip Editor outputs are indexed under Clip Library → Edited clips rather than being mixed into the original captured Clips view.
20.16 What happens to my clips if the trial expires?
Existing clips remain accessible through the application/library. The expired entitlement primarily blocks creation of new captured content and restricted editor/capture routes until a valid licence is activated.